Working with Forms in Grok
| Author: | Kevin Teague |
|---|
A walkthrough of the basics of automatically generating HTML forms using Grok, as well as a discussion of a few more advanced Form manipulations.
Introducing Forms
An overview of the Form infrastructure in Grok
When working with HTML Forms in Grok, they are simply treated as a special type of View. The Form base class inherits from grok.View.
Just like you might make a simple View for an Application:
class MammothApplication(grok.Application, grok.Container):
    """World's greatest Mammoth manager web application."""

class Index(grok.View):
    def render(self):
        return "Augh! The application, it does nothing!"
You can replace the default View with a Form View.:
class Index(grok.Form):
    "An empty Form"
This will render a complete - albiet completely empty - form. The default HTML rendered for a blank form will look like:
<html>
<head>
<base href="http://localhost:8080/mammoth/@@index" />
</head>

<body>

<form action="http://localhost:8080/mammoth/@@index"
      method="post" class="edit-form"
      enctype="multipart/form-data">

  <table class="form-fields">
    <tbody>
        <tr>
          <td class="label">
          </td>
          <td class="field">
          </td>
        </tr>
    </tbody>
  </table>

  <div id="actionsView">
  </div>

</form>

</body>
</html>
Forms provide the ability to customizing the template used to generate the HTML, as well as for handling the label of the form, the fields of a form, buttons of a form, the action that gets called when a form is submitted, and finally a way to automatically generate forms for creating and editing your Model objects.
Forms in Grok let you create complete working HTML Forms with very little code. Let’s look at a more complete example:
class Edit(grok.EditForm):
    form_fields = grok.AutoFields(Mammoth)
    label = 'Edit Mammoth'

    @grok.action('Edit Mammoth')
    def edit(self, **data):
        self.applyData(self.context, **data)
        self.redirect(self.url(self.context))
In a short 7 lines of code this produces a complete working form that allow you to edit a Mammoth model object. When this form is viewed it looks like:
However, there are a lot of use-cases for working with forms, and this tutorial is intended to guide you through the many ways you can make the Grok Forms work towards what you want your application to do.
Defining Schema Fields
Schema Fields are used to describe the schema of an ordinary Python object. Before we dig into the details of Forms, it’s helpful to familiarize yourself with how Grok and Zope 3 allow you to describe the schema of any ordinary Python object.
Typically in a web application, one will have the concept of a model layer - this is where the data model is described and implemented. The model layer is separate from the View and the Template layers. It knows nothing about HTML or responding to HTTP Requests, and is only concerned with maintaining the integrity of your applications data and providing core behaviour.
In Grok your model layer is typically defined as inheriting from classes which inherit from grok.Application, grok.Container and grok.Model. All of these base classes allow objects to be seamlessly stored in a database. Depending upon if you are making the distinction between the part of your Model layer which is only concerned with storing data (data model), or you are viewing the Model layer as everything which defines core application functionality (application model), then you may also consider your model layer as also including Adapters, Utilities and Subscribers.
Objects in your data model layer are usually going to want to provide a formal description of the type of data that they contain. In Grok this formal description of the data that a model object contains is called a schema. In relational database terms, you can think of a schema as being similar to a CREATE TABLE statement. It describes a collection of data fields.
When creating a schema in a relation database you might write:
CREATE TABLE mammoth (
    furryness   text NOT NULL DEFAULT 'Brown. Average quality.',
    weight      integer NOT NULL,
    owner       varchar(200),
);
The equivalent declaration as Zope schema would be:
from zope import schema
from zope import interface

class IMammoth(interface.Interface):
    furryness = schema.Text(
        title = u'Furryness',
        default = u'Brown. Average quality.',
    )
    weight = schema.Int(
        title = u'Weight',
    )
    owner = schema.TextLine(
        title = u'Owner',
        required = False,
    )
However, Grok goes one step farther in it’s seperation of concerns than most other web frameworks and doesn’t tightly tie the use of data schemas to just objects that map to a database and are part of a specific Object Relation Mapper (ORM). Schemas can be used with any ordinary Python object.
Consider three sources of Python objects which contain and deal with data: a Model object which is stored in a database, a Form object which is submitted from an HTTP Request, and a call to an external web service which pulls data in to the application via HTTP. All three types of objects contain data, so it’s helpful to be able to use the same system for formally describing the data in any Python object.
This schema feature is provided by the zope.schema package. This package extends the notion of Interfaces as defined in the zope.interface package. Remember, Interfaces are a way of formally describing a set of method signatures and attributes. An orindinary Attribute defined by zope.interface only allows you to descirbe the name and doc string of an Attribute. Schemas extend the basic Attribute of interfaces to allow for more detailed descriptions. An Attribute which has this extended description is called a Schema Field (or just Field). It allows for additional descriptions of an Attribute such as title, required and default.
If we were only working with simple Interfaces, and we wanted to describe a the data that a Mammoth object provided we would write:
from zope import interface

class IMammoth(interface.Interface):
    "Describes a Mammoth"
    furryness = interface.Attribute("Furryness.")
    weight = interface.Attribute("Weight")
    owner = interface.Attribute("Owner")
This is very generic though. Let’s go back to the zope.schema version of our Mammoth and enrich the description of the data even further:
class IMammoth(interface.Interface):
    "Describes a Mammoth"
    furryness = schema.Text(
        title = u'Description of the fur.',
        description = u"""
This field is primarily used by cavemen to aid in sorting and processing
the mammoths in the spring during fur harvesting season.""",
        required = True,
        default = u'Brown. Average quality.',
    )
    weight = schema.Int(
        title = u'Weight',
        description = u'Measured in Kilograms',
        required = True,
    )
    owner = schema.TextLine(
        title = u'Name of the owner.',
        description = u'Kept as a pet unless the owner is very hungry.',
        required = False,
    )
By extending the description of an ordinary Python attribute, we can use that information to automatically map data into an ORM, a web service call, or generate an HTML Form.
Further Reading and Reference
For more reading see the documentation that is part of the zope.schema package.
For now though it is helpful to remember that a Schema Field is simply an extensible description of a Python attribute. Every Schema Field description in an Interface must inherit from zope.schema.interfaces.IField. This interface looks like:
class IField(Interface):
    """Basic Schema Field Interface.

    Fields are used for Interface specifications.  They at least provide
    a title, description and a default value.  You can also
    specify if they are required and/or readonly.

    The Field Interface is also used for validation and specifying
    constraints.

    We want to make it possible for a IField to not only work
    on its value but also on the object this value is bound to.
    This enables a Field implementation to perform validation
    against an object which also marks a certain place.

    Note that many fields need information about the object
    containing a field. For example, when validating a value to be
    set as an object attribute, it may be necessary for the field to
    introspect the object's state. This means that the field needs to
    have access to the object when performing validation::

         bound = field.bind(object)
         bound.validate(value)

    """

    def bind(object):
        """Return a copy of this field which is bound to context.

        The copy of the Field will have the 'context' attribute set
        to 'object'.  This way a Field can implement more complex
        checks involving the object's location/environment.

        Many fields don't need to be bound. Only fields that condition
        validation or properties on an object containing the field
        need to be bound.
        """

    title = TextLine(
        title=_(u"Title"),
        description=_(u"A short summary or label"),
        default=u"",
        required=False,
        )

    description = Text(
        title=_(u"Description"),
        description=_(u"A description of the field"),
        default=u"",
        required=False,
        )

    required = Bool(
        title=_(u"Required"),
        description=(
        _(u"Tells whether a field requires its value to exist.")),
        default=True)

    readonly = Bool(
        title=_(u"Read Only"),
        description=_(u"If true, the field's value cannot be changed."),
        required=False,
        default=False)

    default = Field(
        title=_(u"Default Value"),
        description=_(u"""The field default value may be None or a legal
                        field value""")
        )

    missing_value = Field(
        title=_(u"Missing Value"),
        description=_(u"""If input for this Field is missing, and that's ok,
                          then this is the value to use""")
        )

    order = Int(
        title=_(u"Field Order"),
        description=_(u"""
        The order attribute can be used to determine the order in
        which fields in a schema were defined. If one field is created
        after another (in the same thread), its order will be
        greater.

        (Fields in separate threads could have the same order.)
        """),
        required=True,
        readonly=True,
        )

    def constraint(value):
        u"""Check a customized constraint on the value.

        You can implement this method with your Field to
        require a certain constraint.  This relaxes the need
        to inherit/subclass a Field you to add a simple constraint.
        Returns true if the given value is within the Field's constraint.
        """

    def validate(value):
        u"""Validate that the given value is a valid field value.

        Returns nothing but raises an error if the value is invalid.
        It checks everything specific to a Field and also checks
        with the additional constraint.
        """

    def get(object):
        """Get the value of the field for the given object."""

    def query(object, default=None):
        """Query the value of the field for the given object.

        Return the default if the value hasn't been set.
        """

    def set(object, value):
        """Set the value of the field for the object

        Raises a type error if the field is a read-only field.
        """
Form Fields extend the information about a Schema Field
Understanding the difference between a form field and a schema field.
Schemas are a collection of schema fields. Schema fields are an extended, abstract description of a Python attribute. From this, we can use schema fields as the basis for automatically generating HTML Forms.
While schema fields provide a rich set of information about attributes, there is even more information that you might want to have when using those schema fields in a form. Thus form objects themselves consist of an ordered collection of form fields. Form fields are distinct from schema fields, and are used to enhance information about a schema field in the context of using that field in a specific Form.
The difference between schema fields and form fields sounds a little confusing, but you can simply auto-generate the form fields from the schema fields.
Typically information in a schema fields provide information about the data Model, independant of how that information might be presented in a user interface. The descriptions for schema fields might only be helpful in the context of a developer or internal business person, but be a poor fit for the user’s of the application. However, in many applications you may decide that you don’t need this additional seperation of information and wish to directly reuse the information in schema fields to automatically render the user interface and autogenerate the form fields from them.
Form fields contain an attribute named field which is the Schema field object which defines the data for the form field. In addition to this field the other attributes provided by a form field is described in the zope.formlib.interfaces.IFormField Interface.:
class IFormField(interface.Interface):
    """Definition of a field to be included in a form

    This should not be confused with a schema field.
    """

    __name__ = schema.ASCII(
        constraint=reConstraint('[a-zA-Z][a-zA-Z0-9_]*',
                                "Must be an identifier"),
        title = u"Field name",
        description=u"""\
        This is the name, without any proefix, used for the field.
        It is usually the same as the name of the for field's schem field.
        """
        )

    field = interface.Attribute(
        """Schema field that defines the data of the form field
        """
        )

    prefix = schema.ASCII(
        constraint=reConstraint('[a-zA-Z][a-zA-Z0-9_]*',
                                "Must be an identifier"),
        title=u"Prefix",
        description=u"""\
        Form-field prefix.  The form-field prefix is used to
        disambiguate fields with the same name (e.g. from different
        schema) within a collection of form fields.
        """,
        default="",
        )

    for_display = schema.Bool(
        title=u"Is the form field for display only?",
        description=u"""\
        If this attribute has a true value, then a display widget will be
        used for the field even if it is writable.
        """
        )

    for_input = schema.Bool(
        title=u"Is the form field for input?",
        description=u"""\
        If this attribute has a true value, then an input widget will be
        used for the field even if it is readonly.
        """
        )

    custom_widget = interface.Attribute(
        """Factory to use for widget construction.

        If not set, normal view lookup will be used.
        """
        )

    render_context = schema.Choice(
        title=u"Should the rendered value come from the form context?",
        description=u"""\

        If this attribute has a true value, and there is no other
        source of rendered data, then use data from the form context
        to set the rendered value for the widget.  This attribute is
        ignored if:

        - There is user input and user input is not being ignored, or

        - Data for the value is passed to setUpWidgets.

        If the value is true, then it is evaluated as a collection of bit
        flags with the flags:

        DISPLAY_UNWRITEABLE
            If the field isn't writable, then use a display widget

            TODO untested


        SKIP_UNAUTHORIZED
            If the user is not priviledges to perfoem the requested
            operation, then omit a widget.

            TODO unimplemented

        """,
        vocabulary=schema.vocabulary.SimpleVocabulary.fromValues((
            False, True,
            DISPLAY_UNWRITEABLE,
            SKIP_UNAUTHORIZED,
            DISPLAY_UNWRITEABLE | SKIP_UNAUTHORIZED,
            )),
        default=False,
        missing_value=False,
        )

    get_rendered = interface.Attribute(
        """Object to call to get a rendered value

        This attribute may be set to a callable object or to
        a form method name to call to get a value to be rendered in a
        widget.

        This attribute is ignored if:

        - There is user input and user input is not being ignored, or

        - Data for the value is passed to setUpWidgets.

        """
        )
Creating a Simple Form
Grok provides four types of Form components, grok.Form, grok.AddForm, grok.EditForm and grok.DisplayForm. The latter three are all specializations of the basic grok.Form class and the grok.Form class itself is a specialization of the grok.View class. This means that all of the methods and attributes available in grok.View are available in any Grok Form. You can rely on self.context to represent the model object that the form is acting upon, and self.request to contain the current HTTP request object.
This also means that in simple cases, it’s not necessary to have both a View class and a Form class, these can both be neatly tied into a single Form class. For more complex use cases it is possible to instantiate and work with several Forms from within one View, this is described later in the tutorial.
We’ll now create the “Mammoth manager”, a simple Grok application that lets us maintain data about a collection of Mammoths. Our starting application looks like:
import grok
from zope import schema
from zope import interface

class IMammoth(interface.Interface):
    "Describes a Mammoth"
    furryness = schema.Text(
        title = u'Description of the fur.',
        description = u"""
This field is primarily used by cavemen to aid in sorting and processing
the mammoths in the spring during fur harvesting season.""",
        required = True,
        default = u'Brown. Average quality.',
    )
    weight = schema.Int(
        title = u'Weight',
        description = u'Measured in Kilograms',
        required = True,
    )
    owner = schema.TextLine(
        title = u'Name of the owner.',
        description = u'Kept as a pet unless the owner is very hungry.',
        required = False,
    )

class MammothApplication(grok.Application, grok.Container):
    """World's greatest Mammoth manager web application."""

class Mammoth(grok.Model):
    grok.context(MammothApplication)
    grok.implements(IMammoth)

    furryness = u''
    weight = 0
    owner = u''

class MammothForm(grok.Form):
    grok.context(MammothApplication)
    grok.name('index')
    form_fields = grok.AutoFields(Mammoth)
You should already be familiar with the basics of a simple Grok application, the interesting part is the MammothForm class. For now we are declaring that this Form is named index so that it the default view for our application is this simple Form.
We’ve added one new line to the Form:
form_fields = grok.AutoFields(Mammoth)
The form_fields attribute in a form must be an object that implements IFormFields. The easiest way to generate a list of form fields that conforms to the IFormFields interface is to use the convenience function grok.AutoFields() upon a model object. This will generate form fields from all schema fields that the object provides.
Often you don’t want to use every schema field in a model object. You can use the select() and omit() methods to choose just the fields you want:
# ask for fields by name
form_fields = grok.AutoFields(Mammoth).select('furryness','owner')

# or choose all fields and remove the unwanted ones
form_fields = grok.AutoFields(Mammoth).omit('weight')
When we view our Grok application, the MammothForm view will be rendered and it looks like this:
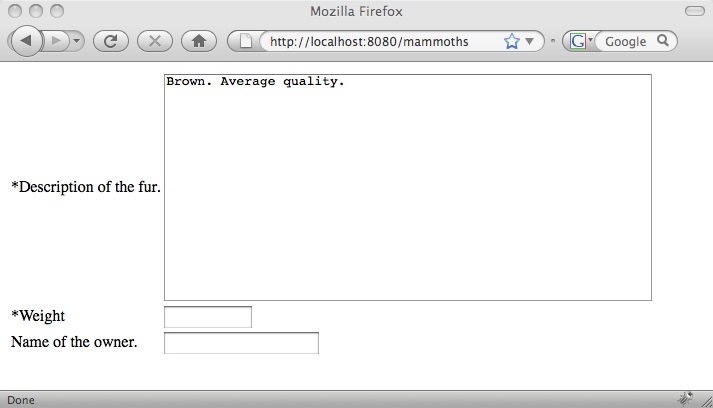
This is a start, but there is a problem with this form. It doesn’t have a submit button! Let’s extend MammothForm so that it can handle the creation of a new Mammoth.:
class MammothForm(grok.AddForm):
    grok.context(MammothApplication)
    grok.name('index')
    form_fields = grok.AutoFields(Mammoth)
    label = "Let's Make a Mammoth"

    @grok.action('Add Mammoth')
    def add(self, **data):
        mammoth = Mammoth()
        self.applyData(mammoth, **data)
        import datetime
        name = str(datetime.datetime.now()).replace(' ','-')
        self.context[name] = mammoth
        return self.redirect(self.url(self.context[name]))

class MammothView(grok.View):
    "Display a Mammoth"
    grok.context(Mammoth)
    grok.name('index')

    def render(self):
        return """
<html><body>
    <p><b>Furryness:</b> %s</p>
    <p><b>Weight:</b> %s kilograms</p>
    <p><b>Owner:</b> %s</p>
</html></body>""" % (
            self.context.furryness,
            self.context.weight,
            self.context.owner,
        )
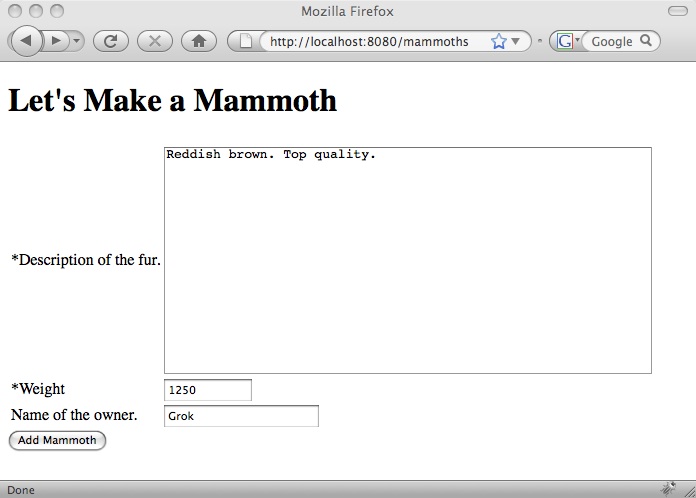
What’s changed? The base class of form to is now an grok.AddForm to indicate that this form is intended for the creation of new Mammoth objects. We have also given our form a label attribute, this value will be displayed at the top of our form to improve the user-interface. We have created an add method that will be called when the form is submitted. The button in our form is automatically rendered and wire it up to the add method by using the grok.action decorator. This decorator takes a single argument which will be used as the name of the button.
Our new form, once filled out and ready for submission, looks like this:
The add method we created uses another feature of forms, the applyData() method. This is a convience method for automatically takign data submitted by the form in the request and setting it as corresponding attributes in the the data object. Calling this method also sends out a grok.IObjectMovedEvent if any of the data has changed.
Customising the default Form templates
Learn how to tweaking the template used to render a form. Useful for integrating a form into your applications custom layout.
Grok provides default templates that are used to render a form. While they are functional, they are also very plain. Furthermore, they have no way of hooking into headers, footers, sidebars and other layout elements of your application.
It’s intended that you override the default templates by providing your own templates. You can tell a form to use a custom template by providing a template attribute in the form:
class Form(grok.Form):
    template = grok.PageTemplateFile('custom_edit_form.pt')
It’s helpful to start by making a copy of the default templates in your application, and then add your customizations as needed.
The default edit form is (part of the grokcore.formlib package):
<html>
<head>
</head>

<body>
<form action="." tal:attributes="action request/URL" method="post"
      class="edit-form" enctype="multipart/form-data">

  <h1 i18n:translate=""
    tal:condition="view/label"
    tal:content="view/label">Label</h1>

  <div class="form-status"
    tal:define="status view/status"
    tal:condition="status">

    <div i18n:translate="" tal:content="view/status">
      Form status summary
    </div>

    <ul class="errors" tal:condition="view/errors">
      <li tal:repeat="error view/error_views">
         <span tal:replace="structure error">Error Type</span>
      </li>
    </ul>
  </div>

  <table class="form-fields">
    <tbody>
      <tal:block repeat="widget view/widgets">
        <tr>
          <td class="label" tal:define="hint widget/hint">
            <label tal:condition="python:hint"
                   tal:attributes="for widget/name">
              <span class="required" tal:condition="widget/required"
              >*</span><span i18n:translate=""
                             tal:content="widget/label">label</span>
            </label>
            <label tal:condition="python:not hint"
                   tal:attributes="for widget/name">
              <span class="required" tal:condition="widget/required"
              >*</span><span i18n:translate=""
                             tal:content="widget/label">label</span>
            </label>
          </td>
          <td class="field">
            <div class="widget" tal:content="structure widget">
              <input type="text" />
            </div>
            <div class="error" tal:condition="widget/error">
              <span tal:replace="structure widget/error">error</span>
            </div>
          </td>
        </tr>
      </tal:block>
    </tbody>
  </table>

  <div id="actionsView">
    <span class="actionButtons" tal:condition="view/availableActions">
      <input tal:repeat="action view/actions"
             tal:replace="structure action/render"
             />
    </span>
  </div>
</form>

</body>
</html>
The default display form is (part of the grokcore.component package):
<html>
<head>
</head>
<body>
<table class="listing">
<thead>
<tr>
<th class="label-column"> </th>
<th> </th>
</tr>
</thead>
<tbody>
<tal:block repeat="widget view/widgets">
<tr tal:define="odd repeat/widget/odd"
tal:attributes="class python: odd and 'odd' or 'even'">
<td class="fieldname">
<tal:block content="widget/label"/>
</td>
<td>
<input tal:replace="structure widget" />
</td>
</tr>
</tal:block>
</tbody>
<tfoot>
<tr class="controls">
<td colspan="2" class="align-right">
<input tal:repeat="action view/actions"
tal:replace="structure action/render" />
</td>
</tr>
</tfoot>
</table>
</body>
</html>
For this example we’ll just put a snippet of CSS into our customised edit form right below that body tag that looks like:
<style type="text/css">
    body {
        background: #f1f1f1;
    }
    form {
        background: #ffffff;
        border: 1px solid #999999;
        padding: 2em;
    }
    form h1 {
        font-family: sans-serif;
        font-weight: bold;
        color: #555555;
        margin-top: 0;
    }
    form .label {
        vertical-align: top;
        padding: 0.5em;
        background: #f9f9f9;
    }
    form .required {
        color: red;
    }
    form textarea {
        border: 1px solid #777777;
        color: #555555;
        font-size: 1.2em;
        line-height: 1.2em;
        padding: 0.5em;
    }
    form input {
        border: 1px solid #777777;
        color: #555555;
        font-size: 1.1em;
        line-height: 1.2em;
        padding: 0.5em;
    }
</style>
Now our MammothForm has a shiny new look and feel:
Customising individual Form Fields
Learn how to customise individual form fields.
Form fields are rendered into HTML by widgets. A widget is similar to a view, except that they are designed to work specifically upon schema fields.
For example, a Text schema field has a TextAreaWidget that is used for input. A DateTime schema field has a DateTimeWidget and a DateTimeDisplayWidget, depending upon whether the field is meant for input or is being displayed as read-only.
The setupWidgets method of the Form class is automatically called for you before the form is rendered. This method is intended to be overridden, so that you can customise the input or display of individual form fields by using modified or different widgets.:
def setUpWidgets(self, ignore_request = False):
    super(MammothForm, self).setUpWidgets(ignore_request)
    self.widgets['furryness'].width = 20
When overridding setupWidgets, first use super() to call the default setupWidgets method. This will set a widgets attribute on your form, and each widget can be referred to by the name of the form field that it is rendering.
In the Mammoth manager application, we want to make the TextArea widget used for the furryness field smaller. We also want to display both the title and the description from the schema field for the weight attribute.:
class MammothForm(grok.AddForm):
    grok.context(MammothApplication)
    grok.name('index')
    form_fields = grok.AutoFields(Mammoth)
    label = "Let's Make a Mammoth"
    template = grok.PageTemplateFile('custom_edit_form.pt')

    def setUpWidgets(self, ignore_request = False):
        super(MammothForm, self).setUpWidgets(ignore_request)
        self.widgets['furryness'].width = 20
        self.widgets['furryness'].height = 3
        self.widgets['weight'].label = '%s (%s)' % (
            self.form_fields['weight'].field.title,
            self.form_fields['weight'].field.description,
        )

    @grok.action('Add Mammoth')
    def add(self, **data):
        mammoth = Mammoth()
        self.applyData(mammoth, **data)
        import datetime
        name = str(datetime.datetime.now()).replace(' ','-')
        self.context[name] = mammoth
        return self.redirect(self.url(self.context[name]))
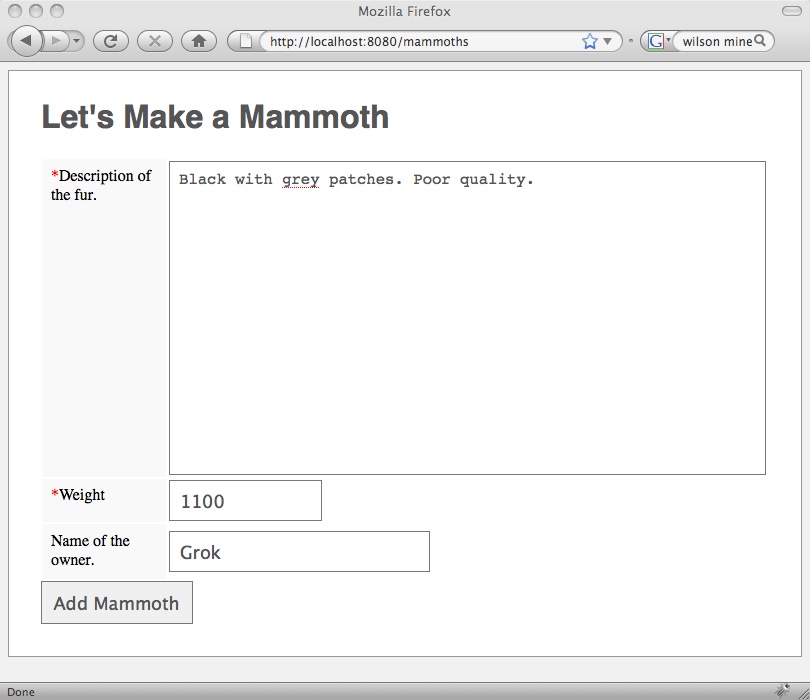
Now we have a smaller text box, and a custom label for the weight:

Remember that every form field is going to have a field attribute that refers to the schema field that the form field is being applied to. Form fields and the widgets used to render each of those fields are unique to every form in your application. The schema fields however are global and are typically used to describe your data model, and this information may be used by many different components. You want to make sure that you only modify form fields and widgets within your form and never modify a schema field. Otherwise these changes will likely produce unwanted side-effects.
Creating custom widgets and overriding widgets globally
How to create new widgets, as well as replace existing widgets with your own custom versions. The widgets used to render form fields in Grok are supplied by the zope.app.form package. You can create your own custom widget and override the default widget on a per field basis, or override that widget globally for all fields of a particular type.
Creating a new widget
Making a widget is fairly straightforward. Every widget implements the zope.app.form.interfaces.IWidget interface. There are number of useful existing widget implementations and base classes to make it easier to implement this interface.
Let’s say that we wanted to make a custom text input widget where the default display width is longer. We could write this widget as:
from zope.app.form.browser.textwidgets import TextWidget

class LongTextWidget(TextWidget):
    displayWidth = 35
Then use it in form on a per field basis with by setting the custom_widget attribute.:
class MammothForm(grok.AddForm):
    form_fields = grok.AutoFields(Mammoth)
    form_fields['owner'].custom_widget = LongTextWidget
Overriding widgets globally
If you want to override every TextLine form field globally, then you need to register an adapter as an override using ZCML. Create a file in your project named overrides.zcml and put the following adapter in it:
<configure
    xmlns="http://namespaces.zope.org/zope"
    xmlns:browser="http://namespaces.zope.org/browser">

    <adapter
        for="zope.schema.interfaces.ITextLine
             zope.publisher.interfaces.browser.IBrowserRequest"
        provides="zope.app.form.browser.interfaces.ITextBrowserWidget"
        factory="gum.widgets.LongTextWidget"
        permission="zope.Public"
        />

</configure>
The you need to tell Zope 3 to include that configuration and have it override the existing configuration with the includeOverrides directive. Change the configure.zcml file in your package to read:
<configure xmlns="http://namespaces.zope.org/zope"
           xmlns:grok="http://namespaces.zope.org/grok">

    <include package="grok" />
    <includeDependencies package="." />
    <grok:grok package="." />
    <includeOverrides file="overrides.zcml" />

</configure>
Now every TextLine form field will use your custom widget. Note that this is very global - so if you have multiple apps within the same server instance, they will all be updated.
Widget interfaces
For reference, the IWidget, IInputWidget and IDisplayWidget interfaces are shown below. Also note that IView in IWidget is from the zope.component.interfaces.IView interface. This interface is quite simple and only declares a generic context and request attribute:
class IWidget(IView):
    """Generically describes the behavior of a widget.

    Note that this level must be still presentation independent.
    """

    name = Attribute(
        """The unique widget name

        This must be unique within a set of widgets.""")

    label = Attribute(
        """The widget label.

        Label may be translated for the request.

        The attribute may be implemented as either a read-write or read-only
        property, depending on the requirements for a specific implementation.

        """)

    hint = Attribute(
        """A hint regarding the use of the widget.

        Hints are traditionally rendered using tooltips in GUIs, but may be
        rendered differently depending on the UI implementation.

        Hint may be translated for the request.

        The attribute may be implemented as either a read-write or read-only
        property, depending on the requirements for a specific implementation.

        """)

    visible = Attribute(
        """A flag indicating whether or not the widget is visible.""")

    def setRenderedValue(value):
        """Set the value to be rendered by the widget.

        Calling this method will override any values provided by the user.

        For input widgets (`IInputWidget` implementations), calling
        this sets the value that will be rendered even if there is
        already user input.

        """

    def setPrefix(prefix):
        """Set the name prefix used for the widget

        The widget name is used to identify the widget's data within
        input data.  For example, for HTTP forms, the widget name is
        used for the form key.

        It is acceptable to *reset* the prefix: set it once to read
        values from the request, and again to redraw with a different
        prefix but maintained state.

        """

class IInputWidget(IWidget):
    """A widget for editing a field value."""

    required = Bool(
        title=u"Required",
        description=u"""If True, widget should be displayed as requiring input.

        By default, this value is the field's 'required' attribute. This
        field can be set to False for widgets that always provide input (e.g.
        a checkbox) to avoid unnecessary 'required' UI notations.
        """)

    def getInputValue():
        """Return value suitable for the widget's field.

        The widget must return a value that can be legally assigned to
        its bound field or otherwise raise ``WidgetInputError``.

        The return value is not affected by `setRenderedValue()`.
        """

    def applyChanges(content):
        """Validate the user input data and apply it to the content.

        Return a boolean indicating whether a change was actually applied.

        This raises an error if there is no user input.
        """

    def hasInput():
        """Returns ``True`` if the widget has input.

        Input is used by the widget to calculate an 'input value', which is
        a value that can be legally assigned to a field.

        Note that the widget may return ``True``, indicating it has input, but
        still be unable to return a value from `getInputValue`. Use
        `hasValidInput` to determine whether or not `getInputValue` will return
        a valid value.

        A widget that does not have input should generally not be used
        to update its bound field.  Values set using
        `setRenderedValue()` do not count as user input.

        A widget that has been rendered into a form which has been
        submitted must report that it has input.  If the form
        containing the widget has not been submitted, the widget
        shall report that it has no input.

        """

    def hasValidInput():
        """Returns ``True`` is the widget has valid input.

        This method is similar to `hasInput` but it also confirms that the
        input provided by the user can be converted to a valid field value
        based on the field constraints.
        """

class IDisplayWidget(IWidget):
    """A widget for displaying a field value."""

    required = Bool(
        title=u"Required",
        description=u"""If True, widget should be displayed as requiring input.

        Display widgets should never be required.
        """)
Using multiple schemas with a Form
Demonstrating using multiple schemas within the same form.
Forms can use fields from multiple schemas. We have seen how grok.AutoFields() can be used to automatically provide all form fields from a class. If that class implements more than one schema, then all fields from all schemas will be used to generate form fields (without any overlap). Grok also provides the grok.Fields() convenience method which let’s us build form fields from schema fields directly.
Let’s say that in the Mammoth manager application we want to automatically send an email notification when a new Mammoth is added, and we’d like to provide a field in the form where a message can be appended to the email. Both grok.AutoFields and grok.Fields return objects that implement the IFormFields interface. This interface supports addition (+), so we can add two collections of form fields together.
We could change the form_fields attribute of the MammothForm class to read:
form_fields = grok.AutoFields(Mammoth) + grok.Fields(
    message = schema.Text(
        title=u'Email Message', required=False
    ),
)
Now when the form is submitted, the data dictionary will contain a key named message with the value entered into the “Email Message” field.
Editing two Model objects in one Form
With a simple grok.Form or grok.AddForm we can generate whatever set of form fields we need. But with a grok.EditForm it’s necessary for the form to bind the fields to the object it’s editing, so that the edit widgets are pre-filled with existing data.
What if we wanted to create a form capable of editing two different Model objects at the same time? How can we tell the form to read and write data to both Model objects?
The answer is to make an EditForm for one primary object, and then create an Adapter that allows us to adapt that primary object to our secondary object.
In the Mammoth manager application we’ll add a location attribute to the MammothApplication. This way the cave men using the application can easily update the application with the location of the herd whenever they are making an edit to an existing mammoth. We’ll need to make an adapter which can take a Mammoth object and extend it with the IHerdLocation interface. We can think of this as the primary object being edited (Mammoth) as providing the attribtues of the secondary object (MammothApplication) via our adapter.
First we update the application object:
class IHerdLocation(interface.Interface):
    "Where's the mammoth herd at?"
    location = schema.Text(
        title = u'Herd Location',
        required = False,
    )

class MammothApplication(grok.Application, grok.Container):
    """World's greatest Mammoth manager web application."""
    grok.implements(IHerdLocation)
    location = u''
Then add an EditMammothForm. The only thing special about this form is that it has form fields for both the Mammoth and IHerdLocation. Once we have the right Adapter in place, the Form class is smart enough that if a field is not provided by the primary object then it will try and adapt the primary object to the interface that contains the field of the secondary object.:
class EditMammothForm(grok.EditForm):
    grok.context(Mammoth)
    grok.name('edit')
    form_fields = grok.AutoFields(Mammoth) + grok.Fields(IHerdLocation)
    label = 'Edit Mammoth'
    template = grok.PageTemplateFile('custom_edit_form.pt')

    @grok.action('Edit Mammoth')
    def edit(self, **data):
        self.applyData(self.context, **data)
        self.redirect(self.url(self.context))
Finally we need to provide an adapter that can take a Mammoth object, and provide the IHerdLocation interface. We’ll implement this by creating a property in the adapter which delegates gettting/setting of the location attribute to the MammothApplication object.:
class MammothHerdLocationAdapter(grok.Adapter):
    "Allows us to edit a MammothApplication via a Mammoth"
    grok.context(Mammoth)
    grok.implements(IHerdLocation)

    def __init__(self, context):
        self.context = context
        self.app = context.__parent__

    def _get_location(self): return self.app.location
    def _set_location(self, value): self.app.location = value
    location = property(_get_location, _set_location)
Now when we edit a Mammoth, the location field will be bound to an instance of the MammothHerdLocationAdapter.
Accessing a Form within another View
Forms are a specialization of the grok.View base class. You can use a form programmatically from within another View if required.
All Forms subclass from grok.View, so they can be instantiated and rendered programmatically, just like any other View.
Let’s say that you wanted to embed MammothForm within another View. You can simply instantiate the form, passing it the same context and request objects that your View was instantiated with.:
class FormWrappedView(grok.View):
    grok.context(MammothApplication)
    grok.name('wrap')

    def render(self):
        form = MammothForm(self.context, self.request)
        form.template = grok.PageTemplateFile('bare_edit_form.pt')
        return """<html><body>%s</body></html>""" % form()
Once you have a form object, you can edit it’s attributes. For example, change the template attribute to use a different template. Calling a form object itself will first update the form, setting up the widgets and processing data from the request, and then call and return the render() method. Howewver, the normal grok.View convention of first calling an a custom update() method if it exists to do any pre-processing is stil followed. If a URL redirect was generated during the update, it is allowed to happen without interruption and normal form processing doesn’t take place.
Forms are grokked during start-up, which means like everything else they are registered with the Zope Component Architecture. That means that you can instantiate a Form object without needing to hard-code the class name in the calling View. This can be useful, since you can refactor your code and move or rename the Form class without needing to change the calling View code.:
from zope import component
form = component.queryMultiAdapter(
    (self.context, self.request),
    name='index'
)